Rocksdb Code Analysis Memtable

Previous on Rocksdb
在之前的博客中讨论了Rocksdb的写入流程,在并发写入的时候Rocksdb提供并发写memtable的选项,但并不是每种memtable实现都可以实现并发写入,Rocksdb的memtable的具体实现有SkipList, HashSkipList, HashLinkList, Vector 具体每个实现的功能比较见Memtable Comparison。 其中Rocksdb的默认实现是SkipList,值得注意的是也只有SkipList提供了Concurrent Insert功能,相比于Leveldb中需要上层提供并发控制的做法,Rocksdb在写memtable性能上有巨大的提升。下面我们具体了解一下Skiplist的相关概念,以及Rocksdb默认memtable实现InlineSkipList的Lock-free Concurrent Insert。
Introduction
SkipList 的创造者 William Pugh 在其发表的论文Concurrent Maintenance of Skip Lists中这样描述,
Skip lists are a probabilistic data structure that seem likely to supplant balanced trees as the implementation method of choice for many applications. Skip list algorithms have the same asymptotic expected time bounds as balanced trees and are simpler, faster and use less space.
这种数据结构可以提供 O(logn)的查找和插入,工程上可以取代平衡树等复杂的数据结构。对于每一个数据节点都有一个height的概念,一个数据节点属于连续的0-height的所有高度层。每一个节点都属于height0,height0等同于一个包含所有数据的链表。但是height0之上,高度越高这一高度包含的节点数越少。查找的时候从最高层开始查找,向下逐层查找目标。如果每一个数据在这一高度出现的概率是1/2,那么总数据有1/2的数据在height1上,1/4的数据在heigth2上,1/8的数据在height3上,以此类推。这样每一层查找结束都可以排除1/2的可能性,这样可以大概理解SkipList 提供 O(logn)的查找和插入效率。典型的SkipList组织结构如下,引用自Wikipedia。

Leveldb Classic SkipList
Leveldb当中对于SkipList的实现相当经典。所以我们从Leveldb开始介绍。Leveldb中最主要的接口是Insert,查找对应的Seek 接口也只是复用了FindGreaterOrEqual 逻辑。所以这里只要关注Insert 接口和FindGreaterOrEqual 函数就可以大致了解SkipList的工作流程了。
// Leveldb
template <typename Key, class Comparator>
void SkipList<Key, Comparator>::Insert(const Key& key) {
  Node* prev[kMaxHeight];
  Node* x = FindGreaterOrEqual(key, prev);

  int height = RandomHeight();
  if (height > GetMaxHeight()) {
    for (int i = GetMaxHeight(); i < height; i++) {
      prev[i] = head_;
    }
    max_height_.store(height, std::memory_order_relaxed);
  }

  x = NewNode(key, height);
  for (int i = 0; i < height; i++) {
    x->NoBarrier_SetNext(i, prev[i]->NoBarrier_Next(i));
    prev[i]->SetNext(i, x);
  }
}
1,调用FindGreaterOrEqual 查找这个key应该插入的位置。同时记录查找过程中,这个插入位置对应的各个高度上的前序节点prev都是哪些。
2,调用RandomHeight 计算这个key 概率上应该所在的高度。
3,如果比当前的最大高度还要大,补全prev,多出来的高度其prev节点应该是head_。
4,创建新节点,将新节点的每一层链接挂好。
// Leveldb
template <typename Key, class Comparator>
int SkipList<Key, Comparator>::RandomHeight() {
  // Increase height with probability 1 in kBranching
  static const unsigned int kBranching = 4;
  int height = 1;
  while (height < kMaxHeight && ((rnd_.Next() % kBranching) == 0)) {
    height++;
  }
  return height;
}
节点高度的确定如下:
均匀分布产生的数值如果是4的倍数,代表1/4的概率命中,那么该节点属于这一层。是否属于下一层,则需要继续产生随机分布的数值,直到概率不命中。那么该节点的当前高度就是height的大小。height属性代表这个节点属于0-height所有高度。
// Leveldb
template <typename Key, class Comparator>
typename SkipList<Key, Comparator>::Node*
SkipList<Key, Comparator>::FindGreaterOrEqual(const Key& key,
                                              Node** prev) const {
  Node* x = head_;
  int level = GetMaxHeight() - 1;
  while (true) {
    Node* next = x->Next(level);
    if (KeyIsAfterNode(key, next)) {
      // Keep searching in this list
      x = next;
    } else {
      if (prev != nullptr) prev[level] = x;
      if (level == 0) {
        return next;
      } else {
        // Switch to next list
        level--;
      }
    }
  }
}
查找流程如下:
1,从MaxHeight 开始查找。
2,如果目标大于当前高度节点,向后移动。
3,如果小于当前高度节点,把当前节点记录到prev[cur_level]中,向下层查找。
4,重复2 和3 步骤,直到查找到最底层返回。
更详细的SkipList插入方法介绍见SkipList的原理与实现
Rocksdb InlineSkipList
Rocksdb利用CAS的特性实现了lock-free concurrent Insert,其内部具体实现是InlineSkipList,Insert接口如下。
template <class Comparator>
template <bool UseCAS>
void InlineSkipList<Comparator>::Insert(const char* key, Splice* splice,
                                        bool allow_partial_splice_fix) {
  // ... build prev and next
  if (UseCAS) {
    for (int i = 0; i < height; ++i) {
      while (true) {
        x->NoBarrier_SetNext(i, splice->next_[i]);
        if (splice->prev_[i]->CASNext(i, splice->next_[i], x)) {
          // success
          break;
        }
        // CAS failed, we need to recompute prev and next. It is unlikely
        // to be helpful to try to use a different level as we redo the
        // search, because it should be unlikely that lots of nodes have
        // been inserted between prev[i] and next[i]. No point in using
        // next[i] as the after hint, because we know it is stale.
        FindSpliceForLevel<false>(key, splice->prev_[i], nullptr, i,
            &splice->prev_[i], &splice->next_[i]);
      }
    }
  }
}
1,首先在查找key插入位置的时候,创建了这个key的前序节点队列prev 和后继节点队列next。
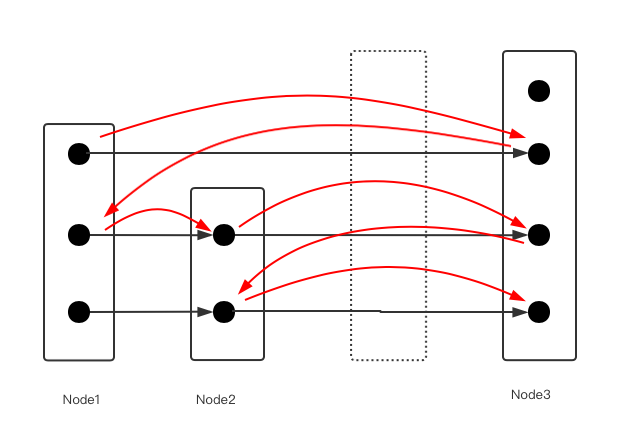
如图所示,虚线代表要插入的节点的位置。
perv[0-1] = node2, , prev[2] = node1
next[0-2] = node3
2,跟Leveldb的插入方法类似,这里在完成新节点的本层挂载时,使用CAS判断prev[i]的下一个节点还是不是next[i],由于是无锁并发,有可能prev[i] 和next[i] 间有其他节点已经Insert。如果发现确实有其他节点插入,那么新节点的本层的prev [i]和 next[i]需要重新计算。
3,调用FindSpliceForLevel更新本层的perv[i]和next[i],之后再尝试重新把新节点挂到SkipList中。
void InlineSkipList<Comparator>::FindSpliceForLevel(
    const char* key,
    Node* before, Node* after,
    int level, Node** out_prev,
    Node** out_next) {
  while (true) {
    Node* next = before->Next(level);
    if (next == after || !KeyIsAfterNode(key, next)) {
      // found it
      *out_prev = before;
      *out_next = next;
      return;
    }
    before = next;
  }
}

template <class Comparator>
bool InlineSkipList<Comparator>::KeyIsAfterNode(const char* key,
                                                Node* n) const {
  return (n != nullptr) && (compare_(n->Key(), key) < 0);
}
重新查找这一层中key的前序和后继。
Conclusion
Rocksdb中提供的并发写入SkipList的接口,这极大提高了SkipList的Insert效率,对于通用的场景,这是一个非常亮眼的优化。但前提是插入的位置并不集中,如果并发写入的位置大概率是同一个位置,会造成线程大概率在重新计算本层的前序和后继,造成CPU资源的浪费。